How to Create AV System Diagrams with Free Schematic Drawing Tools
In today's fast-paced, tech-driven AV industry, accuracy, clarity, and collaboration are essential to executing any successful project—whether you're designing a simple home theater or a multi-room enterprise AV setup. One of the most critical steps in this process is diagramming the AV system. A detailed AV system diagram acts as the blueprint for your entire project, helping to plan, communicate, and troubleshoot effectively.
Fortunately, you don't need expensive software to do it right. Thanks to the evolution of free schematic drawing software, even small integrators and solo AV professionals can create professional-grade diagrams. In this comprehensive guide, we'll walk you through the importance of AV diagrams, how to create them, and which free tools are most effective for the job. Whether you're using AV design software, AV rack design software, or basic AV drawing tools, this blog has you covered.
Why AV System Diagrams Are Crucial
AV diagrams are more than just visual aids; they are operational blueprints. Here are key reasons why creating a proper AV diagram is non-negotiable:
Clear Communication: Helps all stakeholders understand the system design.
Efficient Installation: Guides installers, saving time and minimizing mistakes.
Troubleshooting Tool: Serves as a map for diagnosing and resolving system issues.
Documentation and Compliance: Necessary for clients, future upgrades, and industry standards.
Client Buy-in: Easier to get stakeholder approval with visual representation.
Using a free schematic drawing software makes this documentation accessible to everyone in the AV ecosystem.
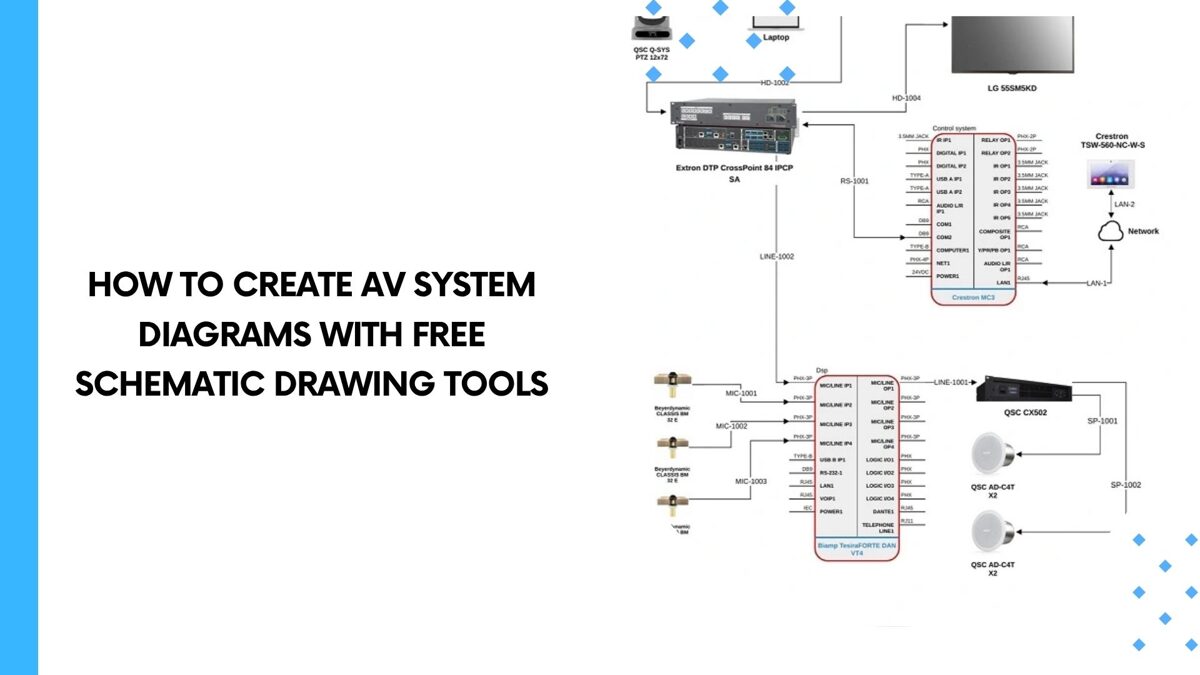
Understanding the Components of an AV Diagram
Before jumping into software, it helps to know what your AV diagram should include:
Sources: Laptops, Blu-ray players, media servers.
Switching Equipment: Matrix switchers, HDMI switches.
Distribution: AV over IP gear, amplifiers, and scalers.
Displays: Projectors, video walls, flat panels.
Audio Components: Speakers, DSPs, microphones.
Control Systems: Touch panels, processors, control cables.
Power Management: Surge protectors, UPS.
Racks and Enclosures: Where everything lives, including power and thermal considerations.
With a clear grasp of these components, the process of using AV system design software becomes more intuitive.
Best Practices for AV Drawing
To create an effective AV system diagram:
Use Consistent Symbols: Adhere to AVIXA or InfoComm standards.
Label Everything Clearly: Use names, model numbers, and connection types.
Color Code Where Possible: Make it easy to differentiate signal types (audio, video, control, power).
Layer Your Diagrams: Separate audio, video, and control layers for better clarity.
Include Cable Paths: Show actual or planned cable runs, not just logical connections.
These practices are easy to implement with the best schematic drawing software free of charge.
Top Free Schematic Drawing Software for AV Diagrams
Let’s explore the most reliable and flexible free tools available today for creating AV diagrams.
1. Draw.io (Now Diagrams.net)
Pros: Cloud-based, intuitive interface, shape libraries.
Best for: Quick AV diagrams and team collaboration.
2. LibreCAD
Pros: Open-source 2D CAD application.
Best for: Detailed floor plans with AV placements.
3. KiCad
Pros: Originally for PCB design but highly customizable.
Best for: Advanced users looking to customize components.
4. QElectroTech
Pros: Designed for electrical schematics.
Best for: Users needing robust circuit-level AV system representation.
5. TinyCAD
Pros: Library of components, easy schematic creation.
Best for: Beginners and intermediate users.
Each of these tools can be a viable option depending on your project scale, experience, and whether you need a lightweight or detailed AV drawing solution.
Step-by-Step Guide to Creating an AV System Diagram
Step 1: Define Your Project Scope
Know what you're designing—boardroom, home cinema, stadium, etc.
Step 2: List Your Components
Create a checklist of all AV devices to include in the system.
Step 3: Choose Your Software Tool
Pick the best free schematic drawing software that suits your project complexity.
Step 4: Use Predefined AV Symbols
Import or create AV symbols for consistent formatting.
Step 5: Connect Your Components
Draw signal paths between sources, processors, displays, and controls.
Step 6: Label All Connections
Specify cable types, directions, and port IDs.
Step 7: Add Notes and Legends
Include a legend for color coding and any special installation instructions.
Step 8: Review and Export
Check for errors, and then export in PDF, PNG, or CAD format.
Creating AV Rack Diagrams
When it comes to rack layouts, AV rack design software helps map out the physical positioning of gear:
Use front and rear elevation views.
Indicate rack units (U).
Show ventilation gaps and power sequencing.
While premium tools offer 3D rendering, free software can still deliver precise and professional schematics.
Using AV Design Software for Collaboration
Many of the tools mentioned offer cloud features or export options:
Draw.io: Integrates with Google Drive for shared editing.
KiCad and TinyCAD: Export in sharable formats for team use.
LibreCAD: CAD exports for integration with architectural drawings.
The use of collaborative tools is essential when multiple integrators, architects, or technicians are involved.
Advantages of Using Free Software for AV Projects
Cost Savings: No licensing fees.
Customization: Open-source tools allow deeper control.
Accessibility: Easy for teams of any size to adopt.
Scalability: Many free tools handle complex, enterprise-level diagrams.
By using the best schematic drawing software free of charge, AV teams can level the playing field with larger firms.
Limitations of Free AV Design Tools
Limited Libraries: Fewer built-in AV symbols.
Manual Customization: More setup required.
No Support: Minimal help compared to premium tools.
Lower Resolution Exports: May lack print-grade options.
Still, for many projects, the trade-offs are worth the cost savings.
Tips for Maximizing Your AV Drawing Workflow
Create Templates: Save time by reusing standard room or rack designs.
Keep a Symbol Library: Build your own component icons.
Standardize Naming Conventions: For devices, cables, and ports.
Back Up Your Files: Especially when using local software.
Train Your Team: One-time learning pays off long-term.
Conclusion
Creating AV system diagrams doesn’t have to be costly. With the right free schematic drawing software, even small teams can produce detailed, professional diagrams that enhance communication, reduce installation errors, and improve system performance. Whether you're just getting started or looking to streamline your workflow, tools like Draw.io, TinyCAD, and LibreCAD offer powerful features to help bring your vision to life.
Incorporating AV design software, AV rack design software, and other AV system design software into your process sets the stage for reliable, scalable, and efficient project execution. So go ahead—download a tool, map your gear, and build your next AV masterpiece.