How to Optimize Your Room Setup for a Long Throw Ratio Projector
Setting up a home theater with a long throw ratio projector offers a cinematic experience with expansive screen sizes and superior image quality. However, achieving optimal performance requires careful planning and room optimization. This guide provides comprehensive steps to ensure your long throw projector delivers the best possible viewing experience.
1. Understanding Long Throw Projectors
What Is a Long Throw Ratio Projector?
A long throw projector is designed to project large images from a considerable distance. Typically, these projectors have a throw ratio greater than 1.5:1, meaning they need to be placed at least 1.5 feet away from the screen for every foot of image width. For instance, to project a 100-inch-wide image, the projector should be positioned approximately 12.5 feet away.
Advantages of Long Throw Projectors
-
Image Quality: They often provide better image clarity and sharpness compared to short throw projectors.
-
Flexibility: Suitable for large rooms or dedicated home theaters where space allows for longer distances.
-
Reduced Distortion: Less prone to image distortion and focus issues that can occur with short throw projectors.
2. Assessing Your Room Dimensions
Measuring Your Space
Before setting up your projector:
-
Room Length: Measure the distance from the intended projector location to the screen wall.
-
Ceiling Height: Ensure there's adequate height for ceiling mounting if desired.
-
Room Width: Consider the width for seating arrangements and speaker placement.
Calculating Throw Distance
Use the projector's throw ratio to determine placement:
Throw Distance = Throw Ratio × Screen Width
For example, with a throw ratio of 2.0:1 and a 100-inch-wide screen:
Throw Distance = 2.0 × 100 inches = 200 inches (16.7 feet)
Ensure your room can accommodate this distance.
3. Selecting the Right Screen
Screen Size and Aspect Ratio
-
Size: Choose a screen size that fits your room and viewing preferences.
-
Aspect Ratio: Common ratios include 16:9 for widescreen and 2.35:1 for cinematic experiences.
Screen Material
-
Matte White: Ideal for rooms with controlled lighting.
-
High Gain: Enhances brightness in larger rooms.
-
Ambient Light Rejecting (ALR): Useful in rooms with some ambient light.
4. Optimizing Lighting Conditions
Controlling Ambient Light
-
Window Treatments: Install blackout curtains or blinds to minimize external light.
-
Lighting Fixtures: Use dimmable lights to control brightness during viewing.
-
Wall Colors: Opt for darker shades to reduce light reflection.
Controlling ambient light enhances image contrast and color accuracy.
5. Positioning the Projector
Mounting Options
-
Ceiling Mount: Keeps the projector out of the way and aligned with the screen.
-
Rear Shelf: Suitable if ceiling mounting isn't feasible.
Alignment and Calibration
-
Lens Shift and Keystone Correction: Use these features to fine-tune image alignment.
-
Focus and Zoom: Adjust to achieve a sharp and properly sized image.
Proper positioning ensures optimal image quality and viewing comfort.
6. Enhancing Audio Experience
Speaker Placement
-
Front Speakers: Place on either side of the screen at ear level.Center Channel: Position directly above or below the screen.
-
Surround Speakers: Place beside or behind the seating area.
Acoustic Treatments
-
Wall Panels: Install to reduce echo and improve sound clarity.
-
Carpeting: Helps absorb sound and reduce reflections.
A well-designed audio setup complements the visual experience.
7. Managing Cables and Connectivity
Cable Organization
-
Conduits and Raceways: Use to conceal and protect cables.
-
Cable Management Systems: Keep cables organized and prevent tangling.
Connectivity Options
-
HDMI: Ensure high-speed cables for 4K content.
-
Wireless Solutions: Consider wireless HDMI transmitters to reduce cable clutter.
Efficient cable management maintains a clean and safe environment.
8. Calibrating Your Projector
Image Settings
-
Brightness and Contrast: Adjust for optimal picture quality.
-
Color Temperature: Set to match your viewing preferences.
-
Gamma and Sharpness: Fine-tune for detailed and balanced images.
Professional Calibration
For the best results, consider hiring a professional to calibrate your projector and audio system.
Conclusion
Optimizing your room for a long throw ratio projector involves careful planning of space, lighting, audio, and equipment placement. By following these guidelines, you can create an immersive home theater experience that rivals commercial cinemas.
How to Create AV System Diagrams with Free Schematic Drawing Tools
In today's fast-paced, tech-driven AV industry, accuracy, clarity, and collaboration are essential to executing any successful project—whether you're designing a simple home theater or a multi-room enterprise AV setup. One of the most critical steps in this process is diagramming the AV system. A detailed AV system diagram acts as the blueprint for your entire project, helping to plan, communicate, and troubleshoot effectively.
Fortunately, you don't need expensive software to do it right. Thanks to the evolution of free schematic drawing software, even small integrators and solo AV professionals can create professional-grade diagrams. In this comprehensive guide, we'll walk you through the importance of AV diagrams, how to create them, and which free tools are most effective for the job. Whether you're using AV design software, AV rack design software, or basic AV drawing tools, this blog has you covered.
Why AV System Diagrams Are Crucial
AV diagrams are more than just visual aids; they are operational blueprints. Here are key reasons why creating a proper AV diagram is non-negotiable:
Clear Communication: Helps all stakeholders understand the system design.
Efficient Installation: Guides installers, saving time and minimizing mistakes.
Troubleshooting Tool: Serves as a map for diagnosing and resolving system issues.
Documentation and Compliance: Necessary for clients, future upgrades, and industry standards.
Client Buy-in: Easier to get stakeholder approval with visual representation.
Using a free schematic drawing software makes this documentation accessible to everyone in the AV ecosystem.
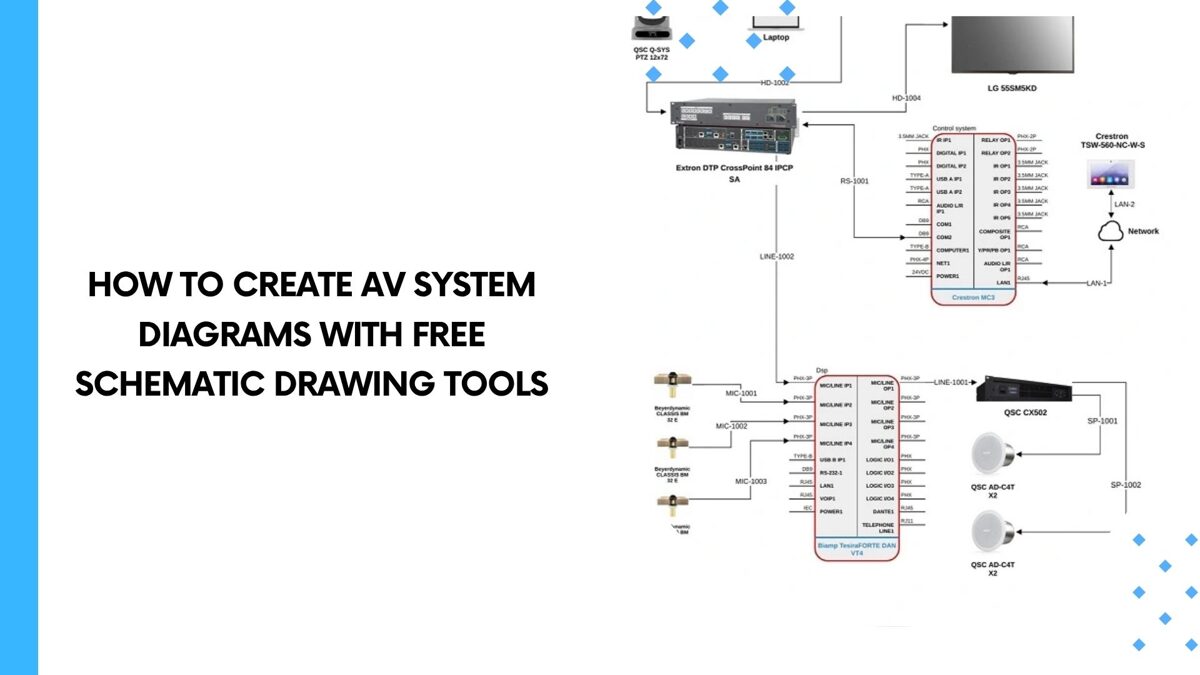
Understanding the Components of an AV Diagram
Before jumping into software, it helps to know what your AV diagram should include:
Sources: Laptops, Blu-ray players, media servers.
Switching Equipment: Matrix switchers, HDMI switches.
Distribution: AV over IP gear, amplifiers, and scalers.
Displays: Projectors, video walls, flat panels.
Audio Components: Speakers, DSPs, microphones.
Control Systems: Touch panels, processors, control cables.
Power Management: Surge protectors, UPS.
Racks and Enclosures: Where everything lives, including power and thermal considerations.
With a clear grasp of these components, the process of using AV system design software becomes more intuitive.
Best Practices for AV Drawing
To create an effective AV system diagram:
Use Consistent Symbols: Adhere to AVIXA or InfoComm standards.
Label Everything Clearly: Use names, model numbers, and connection types.
Color Code Where Possible: Make it easy to differentiate signal types (audio, video, control, power).
Layer Your Diagrams: Separate audio, video, and control layers for better clarity.
Include Cable Paths: Show actual or planned cable runs, not just logical connections.
These practices are easy to implement with the best schematic drawing software free of charge.
Top Free Schematic Drawing Software for AV Diagrams
Let’s explore the most reliable and flexible free tools available today for creating AV diagrams.
1. Draw.io (Now Diagrams.net)
Pros: Cloud-based, intuitive interface, shape libraries.
Best for: Quick AV diagrams and team collaboration.
2. LibreCAD
Pros: Open-source 2D CAD application.
Best for: Detailed floor plans with AV placements.
3. KiCad
Pros: Originally for PCB design but highly customizable.
Best for: Advanced users looking to customize components.
4. QElectroTech
Pros: Designed for electrical schematics.
Best for: Users needing robust circuit-level AV system representation.
5. TinyCAD
Pros: Library of components, easy schematic creation.
Best for: Beginners and intermediate users.
Each of these tools can be a viable option depending on your project scale, experience, and whether you need a lightweight or detailed AV drawing solution.
Step-by-Step Guide to Creating an AV System Diagram
Step 1: Define Your Project Scope
Know what you're designing—boardroom, home cinema, stadium, etc.
Step 2: List Your Components
Create a checklist of all AV devices to include in the system.
Step 3: Choose Your Software Tool
Pick the best free schematic drawing software that suits your project complexity.
Step 4: Use Predefined AV Symbols
Import or create AV symbols for consistent formatting.
Step 5: Connect Your Components
Draw signal paths between sources, processors, displays, and controls.
Step 6: Label All Connections
Specify cable types, directions, and port IDs.
Step 7: Add Notes and Legends
Include a legend for color coding and any special installation instructions.
Step 8: Review and Export
Check for errors, and then export in PDF, PNG, or CAD format.
Creating AV Rack Diagrams
When it comes to rack layouts, AV rack design software helps map out the physical positioning of gear:
Use front and rear elevation views.
Indicate rack units (U).
Show ventilation gaps and power sequencing.
While premium tools offer 3D rendering, free software can still deliver precise and professional schematics.
Using AV Design Software for Collaboration
Many of the tools mentioned offer cloud features or export options:
Draw.io: Integrates with Google Drive for shared editing.
KiCad and TinyCAD: Export in sharable formats for team use.
LibreCAD: CAD exports for integration with architectural drawings.
The use of collaborative tools is essential when multiple integrators, architects, or technicians are involved.
Advantages of Using Free Software for AV Projects
Cost Savings: No licensing fees.
Customization: Open-source tools allow deeper control.
Accessibility: Easy for teams of any size to adopt.
Scalability: Many free tools handle complex, enterprise-level diagrams.
By using the best schematic drawing software free of charge, AV teams can level the playing field with larger firms.
Limitations of Free AV Design Tools
Limited Libraries: Fewer built-in AV symbols.
Manual Customization: More setup required.
No Support: Minimal help compared to premium tools.
Lower Resolution Exports: May lack print-grade options.
Still, for many projects, the trade-offs are worth the cost savings.
Tips for Maximizing Your AV Drawing Workflow
Create Templates: Save time by reusing standard room or rack designs.
Keep a Symbol Library: Build your own component icons.
Standardize Naming Conventions: For devices, cables, and ports.
Back Up Your Files: Especially when using local software.
Train Your Team: One-time learning pays off long-term.
Conclusion
Creating AV system diagrams doesn’t have to be costly. With the right free schematic drawing software, even small teams can produce detailed, professional diagrams that enhance communication, reduce installation errors, and improve system performance. Whether you're just getting started or looking to streamline your workflow, tools like Draw.io, TinyCAD, and LibreCAD offer powerful features to help bring your vision to life.
Incorporating AV design software, AV rack design software, and other AV system design software into your process sets the stage for reliable, scalable, and efficient project execution. So go ahead—download a tool, map your gear, and build your next AV masterpiece.
How to Find the Perfect Projector Placement for Any Room
A high-quality projector can transform your living space, home theater, or conference room into a cinematic experience. But even the most expensive projector will fail to deliver a crisp and immersive image if it's not positioned correctly. That’s why learning how to find the perfect projector placement for any room is essential. Whether you're setting up a home cinema, gaming station, or office presentation system, proper projector placement will make the difference between a subpar display and a breathtaking one.
This comprehensive guide will walk you through everything you need to know about projector placement, from understanding why it matters to calculating throw distances and using online tools. Let's dive in.
Why Getting Projector Placement Right Makes All the Difference
You may be tempted to set up your projector and screen wherever they physically fit, but this can severely impact image quality. Here's why precise placement is crucial:
Image Sharpness: Projectors are designed to focus best at specific distances. Incorrect placement can lead to blurry images.
Screen Fill: The size of the projected image depends on the distance from the screen. If you're too close or too far, the image may not fill the screen properly.
Keystone Distortion: Improper angles lead to keystone effects, where the image appears trapezoidal instead of rectangular.
Brightness and Clarity: The farther a projector is from the screen, the dimmer the image becomes. Proper distance ensures optimal brightness.
Immersion: Especially in home theaters, correct placement contributes to the overall immersive experience.
Factors That Influence Projector Placement
Finding the best spot for your projector isn’t just about trial and error. Several important factors must be considered:
Throw Ratio: This is the ratio of the distance from the projector to the screen, relative to the width of the image. Different projectors have different throw ratios—short throw, ultra-short throw, and standard throw.
Room Dimensions: Ceiling height, room length, and screen size all impact where the projector should go.
Mounting Options: Decide whether you'll mount the projector on the ceiling, place it on a table, or use a projector stand.
Lens Shift and Keystone Correction: Some projectors come with lens shift and keystone correction features, allowing more flexible placement.
Ambient Light Levels: Brighter rooms may require a shorter throw and higher brightness projectors.
Screen Type and Size: A larger screen requires the projector to be further away or to have a different lens setup.
Using a Projector Calculator to Nail Your Placement
One of the most effective tools for ensuring precise placement is a projector calculator. These online tools help you determine the optimal throw distance and image size based on your specific projector model and screen dimensions.
Benefits of Using a Projector Placement Calculator:
Takes guesswork out of the equation
Provides exact throw distances
Suggests optimal screen sizes
Offers mounting height recommendations
Most major projector manufacturers and third-party websites offer these calculators. Simply input your projector model, screen size, and preferred mounting position to get precise recommendations.
Step-by-Step: How to Use a Projector Placement Calculator
Select Your Projector Brand and Model: Accurate input ensures proper calculations.
Enter Screen Size or Desired Image Size: Choose diagonal size in inches.
Choose the Mounting Type: Tabletop, ceiling mount, rear projection, etc.
Input Room Dimensions: Helps in ensuring the projector fits and works optimally.
Adjust Throw Distance Parameters: Many calculators allow you to slide a bar to see how image size changes with distance.
View Recommendations: The calculator will provide a recommended range for throw distance, mounting height, and lens shift.
How to Calculate Projector Distance Without a Calculator
If you prefer the manual method or need a quick estimate without a tool, use this formula:
- Distance= Throw Ratio x Image Width
For example, if your projector has a throw ratio of 1.5:1 and your screen is 100 inches wide:
- Distance= 1.5 x 100= 150 inches (12.5 Width)
Keep in mind:
Throw ratios can often be found in the projector's manual or specs sheet.
Adjust for zoom lenses if applicable.
Always convert units for consistency.
Typical Throw Ratios by Projector Type:
Ultra-Short Throw: 0.4:1 or less
Short Throw: 0.4:1 – 1.0:1
Standard Throw: 1.0:1 – 2.5:1
Long Throw: 2.5:1 and above
Common Mistakes to Avoid When Setting Up Your Projector
Ignoring the Throw Ratio: Using a projector with a long throw in a small room results in an oversized or unfocused image.
Improper Height Alignment: The projector lens should be aligned with the top or bottom edge of the screen (depending on mounting).
Overreliance on Keystone Correction: Keystone should be a last resort as it degrades image quality.
Forgetting Ventilation: Projectors need airflow to avoid overheating. Don't place them in tight enclosures.
Using the Wrong Screen Size: Bigger isn’t always better. Match your screen size to your room and projector specs.
Placing the Projector Off-Center: Even with lens shift, off-center placement can result in distortion or poor focus.
Conclusion
Perfect projector placement is a blend of science and strategy. By understanding the key factors like throw ratio, room dimensions, and screen size—and by using tools like projector calculators—you can achieve a crystal-clear image that truly impresses. Avoiding common mistakes and relying on accurate calculations will help you make the most of your projector investment. With the right setup, any room can become the ultimate viewing space.
Whether you're a home theater enthusiast or setting up a business presentation suite, let this guide be your roadmap to flawless projector placement.